Taking a Saddle Template
The following steps show you how to take a wither template that you can send to Better Saddles as part of the process of getting a custom made saddle.
To start with you will need,
- 60cm Flexible curve
- A3 sheet of paper
- Felt tipped pen
- Extra person to help!
Step 1
Run you fingers along your horse’s shoulder and find the back edge of the shoulder blade. Sometimes on a well covered horse this can take a bit of probing but you will feel the shoulder blade outline. You may find it easier to locate if you ask your helper to pick up the front foot and lift it forward – you will feel the movement of the shoulder blade.


Step 2
Fold you flexible curve (or whatever tool you choose to use) in half but leaving a loop in the end.

Step 3
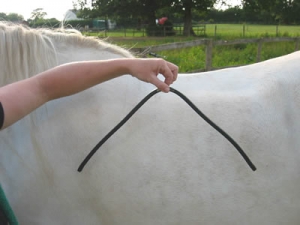
Place the flexible curve over the horse’s back about 4cm behind the back edge of the shoulder blade.

Step 4
Using one hand to keep the flexible curve in position; use the other hand to smooth the flexible curve against the horse’s side. If you have a helper available then ask them to keep their finger on the top of the flexible curve to hold it in position whilst you go around to the other side of the horse. You will need to smooth the flexible curve against the horse’s side again on this side.


Step 5
You should now have the flexible curve sitting across the horse’s wither. At this time, just re-check that the flexible curve has not moved too far away from the back of the shoulder blade.


Step 6
Carefully remove the flexible curve from the horse’s back and lay it on a piece of paper making sure you remember which side is left and right (Picture 10). Trace around the inner edge and mark left and right on your drawing.

Step 7
If you are sending the template to us; add to the paper your name, address, contact numbers, horse’s name, age, height, breed and date the template was taken.
We stock flexicurves in our online shop.
